The Big Event! Offers on Paint, Flooring, Doors & more
Skip to content Skip to navigation menu
Basket
0
Sleeper_pathway.jpeg

Ideal for gardens that are in regular use, paths provide handy walkways that you can use to zone, separate and border your spaces. Often leading to accessible areas in your garden such as the shed, bins, patio or pond, they can also be an attractive way to break up your lawn and avoid trodden down grass.

While pathways can be made from any number of different landscaping materials including concrete, paving slabs and stone tiles, timber sleepers provide a solution that’s versatile, rugged and easy to lay. With a little imagination, they can be used in a variety of ways and don’t require much expertise or experience.

Whether you’re planning a garden makeover or have leftover sleepers ripe for a project, here are our planning tips and project advice on how to lay a sleeper path.
Sleeper_pathway_2.jpeg
Deciding on your design

Winding down the garden between flower beds and trees or straight through your lawn, your sleeper pathway design can be as simple or as complex as you want it to be.

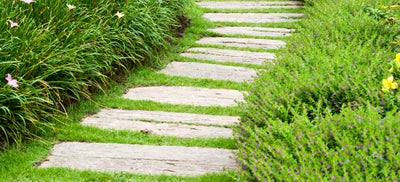
Try digging out and placing each board individually so they are submerged in the ground like stepping stones.

Dig out the entire pathway, position the sleeper boards then fill between the gaps with decorative stones or gravel. We recommend lining your pathway with landscaping fabric after you dig the foundations to prevent weeds from growing in between your boards.

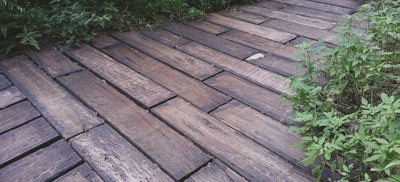
Lay long sleeper foundations like a traditional railway track that act as supports for each of the secured sleeper boards.

To ensure the boards aren’t too close together that they become a trip hazard, we think a spacing of around 300mm between each or a 40mm gap between pairs works best.

Depending on the size of your garden, your preferred style and level of experience, it’s a good idea to look online for inspiration before drawing up a rough sketch to plan your design.

Outdoor_wooden_flooring.jpeg
Planning for materials

Once you know where the path will be positioned, you’ll need to plan for the timber and materials by considering the length of your path and the width of each sleeper board.

Sleepers are available in either softwood or hardwood varieties and come untreated or pressure treated against rot and decay. The type of sleeper you choose to work with will depend on your budget and how long you intend the project on lasting for.

While softwoods are easier to work with and a more budget-friendly choice, you can typically expect a longer life from hardwood builds that have been treated with suitable finishes.

Once you have worked out how much timber you’ll need, it’s worth stocking up on any tools, materials and finishing touches you plan on adding too.

You may find that you can make an economical saving by buying longer sleeper lengths and cutting them to size. To do this, you will need to invest in a good quality power saw and a universal handsaw to tackle any areas the blade can’t reach.

Shovel_in_soil.jpeg
Clearing, foundations and levelling

Once you’ve firmed up your design it’s time to measure and mark out your pathway. Using your tape measure and a marking paint or chalk measuring out tool, mark the entire outline of your path or each of the sleeper board positions. This will act as a visual guide for perfect placement.

When you’re happy with the placement, clear any vegetation and dig out your path outline or each of the sleeper channels using a shovel and wheelbarrow for easy transportation. The boards will sit on a thin layer of sand, so you’ll want to allow each board to protrude from the surface by about 25mm to allow for ground settling.

To account for any natural sloping and ensure the foundations of your path are level and flat, it’s a good idea to use a string lines strung between wooden stakes.

Cutting_timber.jpeg
Cutting your sleepers

Cutting your sleepers to size is best achieved with a circular saw. If you choose to work with softwood, it’s possible to use a universal saw but this can make for hard work.

Set your circular saw to its maximum depth then measure, mark and scribe your cut line on each sleeper. Ensuring you are wearing protective equipment including safety goggles, gloves and a dust mask, run the blade through eat cut line until each sleeper is cut to size.

Sleepers can be quite rough to touch, so depending on the look you’re going for it can be a good idea to sand back the top surface with a belt sander, until smooth. To aid water run-off, you may also choose to plane each edge for a slightly chamfered profile.

For added protection against rot and decay as the sleepers will be partly submerged in the ground, brush each cut end and surface with a generous coat of wood preserver before allowing to dry. If you wish to add finishes or other treatments to your sleepers, this is the best time to do so.

shovel_soil.jpeg
Fastening

Laying sharp sand into your channels or in the dug area of your pathway will ensure each board has a nice even foundation. Pour in a layer of around 25mm and pack it down using one of your sleepers or a tamper.

Place each sleeper or position the boards into your lined channel, then use a heavy-duty hammer to tamp each down until they feel snug and secure.

For securing your sleepers to railway-like supporting boards, you will need to use heavy-duty timber screws. If you are working with hardwood sleepers, you should ensure that you use stainless-steel as the natural tannins can corrode non-ferrous metals. If you choose to work with hardwood, you will need to pilot the holes for fastening. Using a wood drill bit that is longer than the depth of your sleeper board, pilot down then secure with an impact driver and your screw.

Back_garden_.jpeg
Finishing

Once your sleeper boards are in place and your pathway is laid out, you can get creative with a range of finishes.

If you didn’t choose to treat your sleepers while cutting them, you can add any number of exterior woodcare treatments to the top surface at this stage. For more finishing ideas, our 5 ways to treat exterior wood details advice on using wood stain, dyes, oils, preservatives and paints.

Using decorative stones and gravel is a contemporary way to line your pathway and fill the gaps between the sleeper boards. Pour the stones into the spaces, then sweep into place for even placement before watering the gravel in and cleaning the path surfaces.

Line your pathway with spiked or post lights for extra illumination and perfect night-time ambience.

In time, depending on the weathering, wear and finish of your sleepers, you may wish to re-treat them for a longer life. In this case, we recommend pressure washing your sleeper path to remove any dirt and grime, then re-coating with protective oil or exterior wood preservative.