The Big Event! Offers on Paint, Flooring, Doors & more
Skip to content Skip to navigation menu
Basket
0

Planning & preparation

  • We are going to show you how to give metal garden furniture a makeover, step by step.
  • Instead of throwing old pieces away or replacing your set up, a fresh paint job can give tired garden furniture a second life with an impressive transformation. Budget-friendly, fast and custom to your style, spray painting metal furniture is a fun and effective DIY job that anyone can have a go at.
  • We chose to restore a chipped and rusty metal table and chair set. While our ‘make do and mend’ project required a fairly minimal amount of preparatory work to remove the flaking paint for the smoothest application, the steps you follow will depend on your project, the condition it’s in and your desired finish.
  • There’s lots of room for creativity with this project, providing the perfect opportunity to use leftover materials from other outdoor projects.
  • If you wish to restore a piece to its former glory or maximise the industrial look with a hint of rust and antique tarnish, you may wish to remove the paint altogether. Likewise, you may need to strip back old layers of paint depending on the condition of your piece for the best finish. It’s worth having a look for inspiration online before you begin, so you have a good idea of your project plan.
  • Not just for metal tables and chairs, you can use these techniques to tackle any number of outdoor metal projects, including garage doors, benches, archways, umbrella stands, sculptures, pipes and much more.
  • These step by step instructions are intended as a guide to showcase a number of techniques that can be used for metal furniture makeovers. While these techniques require little skill and experience, you should seek further advice or research online if you are unsure.
  • Depending on what you already have to hand, the materials for this project will cost around £40. The condition of your project will dictate how long it takes complete, however, if it’s a fairly simple makeover, you can expect the project to take about 4 hours to complete. To ensure you allow for sufficient drying time, we recommend setting aside a weekend for this project.

Doing it right

  • For this project and any other furniture restoration project, a degree of planning and patience is required. Whether it’s scouring, de-rusting, priming or painting, it’s important not to rush, in order to get the best finishes.
  • The condition of your project will dictate whether any repair work needs to be undertaken. We recommend checking any hinges, bolts, feet and any removable fixtures to see if anything needs replacing or fixing before you begin.
  • There is no right or wrong when it comes to finishing your project, and you can find great inspiration for colours and trends online. If you’re not happy with your finished piece, you can simply brush everything down and give it another go.
  • We highly recommend using spray primer and spray paints for metal furniture projects, as they’re easy to apply with a smooth finish and great for pieces with intricate details and curves. If you would prefer to work with exterior paint and brushes, work slowly to apply thin and even coats until you have your desired coverage.
  • Spray paint can be messy to work with, so you may wish to protect your floor or surfaces with old sheets, plastic, paper, cardboard or even use a spray paint shelter.
  • Watch our top tip videos for our Wickes DIY skills, tips and advice.

Staying safe

  • Always ensure that you wear adequate safety equipment for spray painting and scouring metal. Inhaling paint fumes can be especially dangerous, so this should include a dust mask, goggles and gloves.
  • If you can’t work outdoors, ensure that your working space is well lit and ventilated, especially when working with paint and decorative finishes.
  • Always check the manufacturer’s label before applying any paints, stains or treatments.

Deciding on your design
Metal_Garden_Furniture.jpeg

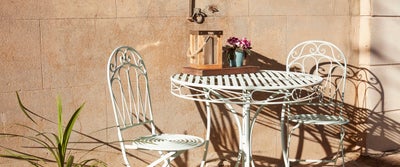
There are many methods and techniques that can be used to transform metal furniture that’s in poor condition but full of potential. This guide details how to prepare, prime and spray paint a metal project, however, the design opportunities are endless.

You can choose to work with as many or as few colours as you like, or you may decide to strip the piece back to its unfinished state for an industrial look. If your piece is naturally rusty and tarnished, this can be a good choice to save extensive metal repair works.

When you have decided on your design, it can be worth sketching up your plan if you have an intricate project or complex makeover.

Gathering materials and prepping your space

View instructions
2.Woman_in_Protective_DIY_Gear.jpeg

Begin by gathering your tools, materials and project to your working space. Once you start painting, you’ll want to have everything to hand, so it’s a good idea to have a little extra paint, all of your protective equipment and any additional tools you might need such as a screwdriver, sander or drill.

We recommend working in an open space when applying paints and finishes to your project. If you can’t work outdoors, you should ensure that your working area is well ventilated.

Spray paint can be messy to work with, so it’s a good idea to protect your floor or the surface you’re working on. Depending on the size and shape of your project you may wish to use old cardboard, newspaper, tarpaulin or dust sheets.

Preparing the project

View instructions
Brushing_Garden_Furniture.jpeg

Before you begin any work you should ensure that your project is as clean as possible so the paint adheres smoothly. Remove any detachable fittings such as a glass top and cushions covers, then place your project in an area that is suitable for cleaning.

Using a bowl of warm water with a little washing-up liquid and a sponge, give your project a good once over to remove any dust, dirt and grime. Rinse everything with more clean water and then leave it to dry.

You can also use a cloth dipped in methylated cleaning spirits to clean and prepare the surfaces. This is especially useful for surfaces that are greasy or grimy from prolonged wear or need to be stripped of oil and wax. Wipe down each surface then rinse everything with clean water before allowing to dry.

Remove rust and paint

View instructions
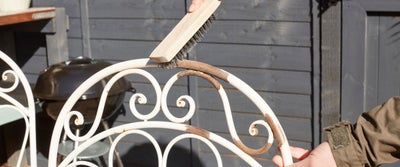
Brushing_Garden_Furniture2.jpeg

Once your project is clean, it’s time to tackle any old finishes, flaking paint and rust. There are several ways to do this depending on what you have to-hand and how much work you have to do.

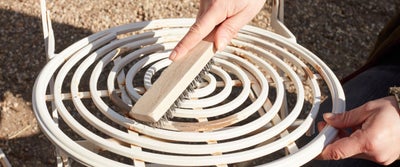
Steel wool is a great abrasive to remove rust and paint and with some elbow grease is sufficient to remove most finishes back the exposed metal. Ideal for projects with intricate details, you can mould the wool to suit hard-to-reach places for the best results. Wire wool is rough to touch so you may wish to use a wire brush or wear protective gloves.

Apply some pressure and scrub the steel wool or wire brush over the surface to lift the flaked paint and rust until smooth. For large, flat areas you may even choose to use a steel wool drill bit for speed.

If you have deep or widespread areas with severe rusting, you may need to treat them with a specialist formula. These gels and fluids are best applied with a brush or according to the manufacturer’s label, then wiped away with a damp sponge once dry.

For larger areas or projects with several stubborn layers of old paint, you can also use an electric sander with a coarse grit paper. Working in circular or back and forth motions, run the sander over each surface until perfectly smooth.


If you don’t plan on painting your project but wish to remove the previous finishes to expose the original metal surface, you may wish to use a paint stripper. Apply the chemical stripper to your surface using a brush, according to the label or instructions.

The paint will begin to bubble and can be removed with a scraper, steel wool or brush.

Once you’re happy that your project is as smooth and as prepared for painting as possible, you’ll need to give the surfaces another wipe or wash down to remove leftover paint, rust and dust.

Using a hose, pressure washer or bucket of water and brush, clean the surfaces again and then leave everything to dry.

Priming the surfaces

View instructions
Priming_Garden_Furniture.jpeg

Now that your surfaces are as smooth as possible and clean of any dust and paint from preparation, it’s time to prime the surface.

Priming before painting is an important step to help the paint adhere to the surfaces. Many formulas also have added rust protection to extend the life of your project and provide additional protection to the surface.

If you’re finishing your project with multiple colours, an intricate design, or wish to leave any areas unpainted, use masking tape to seal the surfaces for neat lines and a tidy finish.

Wearing your protective equipment, shake the primer can according to the label, then apply in sweeping motions to apply an even and steady coat to the surfaces.

When you’re happy with the coverage, set your project aside to dry. Primer tends to dry quite quickly, so you probably want to apply a couple of coats for the best results.

Painting your project

View instructions
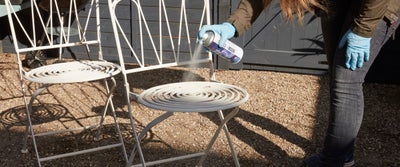
Painting_Garden_Furniture.jpeg

Once the primer has dried, you can begin your paint makeover.

Ensuring you’re wearing protective equipment including your dust mask, goggles and gloves, shake the spray tin according to the manufacturer’s instructions, to prepare the paint. It’s important to shake the can vigorously before use to prepare the paint, as well as periodically during painting to continuously mix any dispersed particles.

Depending on the shape, size and details of your project, it’s usually best to spray your project in sections to ensure you reach each surface and all of the intricate details such as the undersides, mouldings and fixings.

Working in sweeping motions as with the primer, spray from left to right in slow, straight and even strokes. You’ll want to ensure that you’re holding the can at the recommended distance away from your project and spraying at a steady speed. This will help to avoid excess paint layering which will cause drips and runs.

If your project has a pattern as ours did, you may wish to follow the design to ensure the paint gets into all the nooks and crannies.

Once you’re happy with the coverage of the first coat, set your project aside to dry in a well-ventilated space. If you’ve applied a thin first coat, this should dry in less than an hour.

Repeat the process until each surface has an even coat and you’ve applied two to three layers of paint for the best finish. You’ll probably need to allow each coat to dry for around an hour before applying the next.

If you need to touch up any areas that you’ve missed or knocked during moving, ensure the paint is thoroughly dry first before re-coating the area. You may be able to fix small imperfections with a lint-free cloth, while larger drips can be removed with fine-grit sandpaper.

When you’re happy with the finish, allow the project to cure so the surfaces are completely hard before removing any masking tape.

Final finishes

View instructions
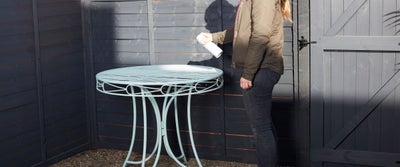
Garden_Furniture.jpeg

Once everything has dried, it’s time to reattach any fixtures and fittings that you removed during the preparation stages. It’s a good idea to spray these separately before reattaching for the best coverage.

If you don’t choose to paint your project, coating the surfaces with a layer of exterior wax can help moisture run-off, protecting your project for a longer life against wear and rot. This is an especially good choice for exposed metals that are open to the elements all year round such a gates or garden archways.

Aftercare

View instructions
Garden_Furniture2.jpeg

The beauty of renovation projects is there’s no right or wrong when it comes to style, design and finishes. If you change your mind or fancy a different look, simply work through the steps to prepare and re-finish your pieces.

Metal will naturally weather over time, so it’s a good idea to keep garden furniture stored in a shed, garage or conservatory when it’s not in use. If you’re short on garden storage, it’s worth investing in a plastic furniture cover.

If your project is subject to knocks, scrapes or scratches, you may choose to give it a touch up of paint to refresh the finish. Make sure the surface is clean and smooth, then prime the area and give it a couple of light coats of paint.

Get creative with furniture makeover inspiration

View instructions
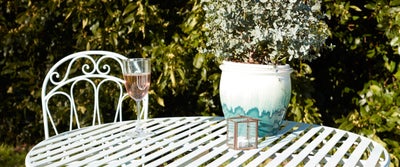
Metal_Outdoor_Furniture.jpeg

Ideal for any size or shape garden, position your garden furniture in a sunny spot for reading, eating and relaxation whatever the time of day.

Pop at the end of the garden for the perfect place to wind down and enjoy a cup of tea or aperitif.

Perfect for courtyards, bijou gardens and balconies, a folding table and chairs provides a space to sit and relax and can be discreetly put away when space is at a premium.

Not just for garden table and chairs, give a rusty metal bench a new lease of life; touch up the garden umbrella stand; refresh the garden gate or give the metal archway a bold new look with a pop of colour.

And not just for the garden either! Metal furniture can introduce a cool industrial edge to indoor spaces, offering the perfect accompaniment to exposed brick interiors. Add metal chairs to your dining table, pop a bench by the back door for the perfect spot for putting on wellies or add a metal table to your conservatory to display your potted plants.

Go for a classic black look with a glossy finish or get creative and confident with colour and introduce a pallet of complementary or clashing garden colours. We love pastels including lemon yellow, soft pink and baby blue against garden shades, but there’s no right or wrong. You should choose a pallet based on your style and taste.

Or try combining a pallet of colours for a considered design such as a table with a dark painted top and white legs. For neat lines and the best finish, use masking tape to prevent runs and drips, allowing the paint to dry fully before removing.

A fun way to add even further decorative styling to your piece, stencils make for quirky designs and are a great way to add a motif or repeat pattern to your surfaces. You could even have a go at making your own stencil with cardboard or recycled plastic.

Using the simple techniques above, you can renovate any number of metal projects. Try scouring your local charity shops, auction sites and car boot sales for pieces that are ripe for transformation.

For more ideas, advice and DIY how-to guides, visit the inspiration hub; and share your #WithWickes project with us online

More inspiration from Wickes